Mission Project
Project Name: Robot Arm Pick and Place System
Libraries used for this Mission
Here are the libraries needed for our Mission.
For GUI and robot camera display we will import:
OpenCV library for camera input and display streams.
IPython.display for jupyter environment camera/ GUI output.
ipywidgets for creating widgets in GUI output.
event_name_pnp custom library for setting current action within GUI.
import cv2 as cv
from IPython.display import display
import ipywidgets as widgets
from event_name_pnp import EventName
For robot arm movement controls we will import:
Arm_Lib library for the robot arm movement functions.
mission_lib custom library for the robot arm movement controls.
from mission_lib_pnp import Movement
import Arm_Lib
mission_lib_pnp custom Library
mission_lib_pnp.py
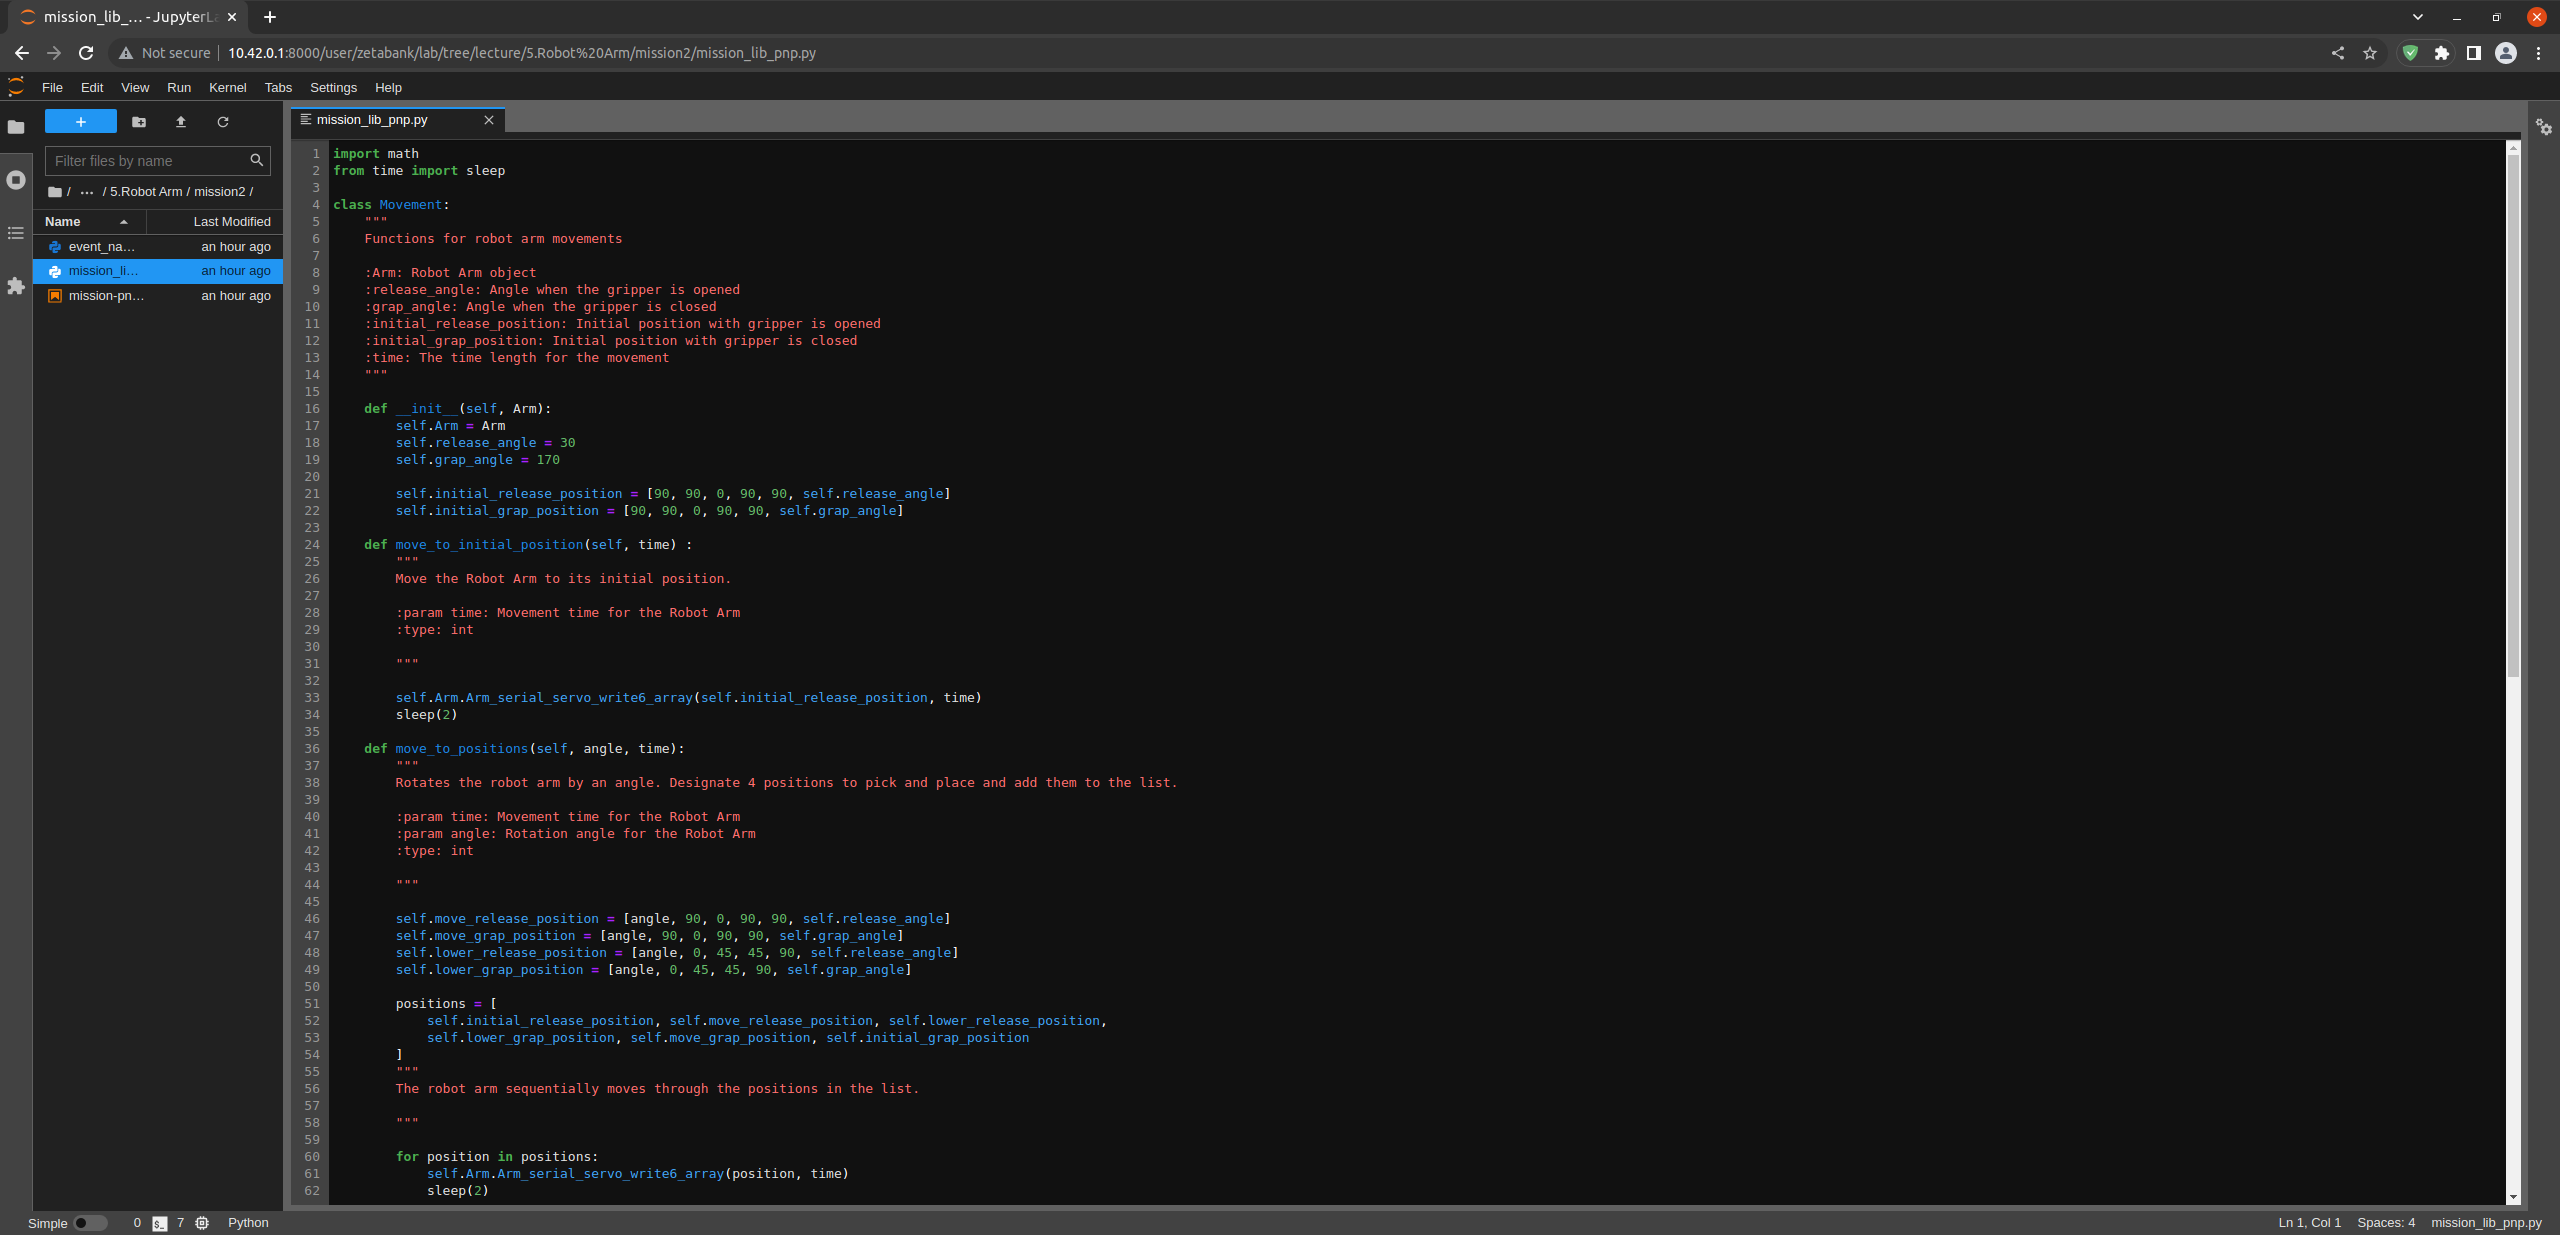
The
mission_lib_pnp.pyallows for functions that would control the robot arm movements. The python file itself contains Movement class with 5 initial variables.Arm: for storing the Arm_Device object (User Input when initializing the Movement object).
release_angle: for storing angle information for the gripper position is opened (default value: 30).
grap_angle: for storing angle information for the gripper position is closed (default value: 170).
initial_release_position: for storing angle information for the six servos initial position with gripper is opened (default value: [90, 90, 0, 90, 90, self.release_angle]).
initial_grap_position: for storing angle information for the six servos initial position with gripper is closed (default value: [90, 90, 0, 90, 90, self.grap_angle]).
class Movement:
    """
    Functions for robot arm movements

    :Arm: Robot Arm object
    :release_angle: Angle when the gripper is opened
    :grap_angle: Angle when the gripper is closed
    :initial_release_position: Initial position with gripper is opened
    :initial_grap_position: Initial position with gripper is closed
    :time: The time length for the movement
    """

    def __init__(self, Arm):
        self.Arm = Arm
        self.release_angle = 30
        self.grap_angle = 170

        self.initial_release_position = [90, 90, 0, 90, 90, self.release_angle]
        self.initial_grap_position = [90, 90, 0, 90, 90, self.grap_angle]
There are total of 2 main functions for move the robot arm sequentially or reset the robot arm. All the functions recieve time parameter from the user. This defined how fast a movement is to be finished.
Main function (reset the robot arm):
The function to reset the robot arm is (
move_to_initial_position). This function returns the six servers to their initial release position.Example:
def move_to_initial_position(self, time) :
    """
    Move the Robot Arm to its initial position.

    :param time: Movement time for the Robot Arm
    :type: int

    """

    self.Arm.Arm_serial_servo_write6_array(self.initial_release_position, time)
    sleep(2)
Main function (move the robot arm sequentially):
The function to sequentially move the robot arm is (
move_to_positions). This function puts six positions into a list and executes them sequentially to perform a pick-and-place operation.Example:
def move_to_positions(self, angle, time):
    """
    Rotates the robot arm by an angle. Designate 4 positions to pick and place and add them to the list.

    :param time: Movement time for the Robot Arm
    :param angle: Rotation angle for the Robot Arm
    :type: int

    """

    self.move_release_position = [angle, 90, 0, 90, 90, self.release_angle]
    self.move_grap_position = [angle, 90, 0, 90, 90, self.grap_angle]
    self.lower_release_position = [angle, 0, 45, 45, 90, self.release_angle]
    self.lower_grap_position = [angle, 0, 45, 45, 90, self.grap_angle]

    positions = [
        self.initial_release_position, self.move_release_position, self.lower_release_position,
        self.lower_grap_position, self.move_grap_position, self.initial_grap_position
    ]
    """
    The robot arm sequentially moves through the positions in the list.

    """

    for position in positions:
        self.Arm.Arm_serial_servo_write6_array(position, time)
        sleep(2)
event_name_pnp custom Library
event_name_pnp.py
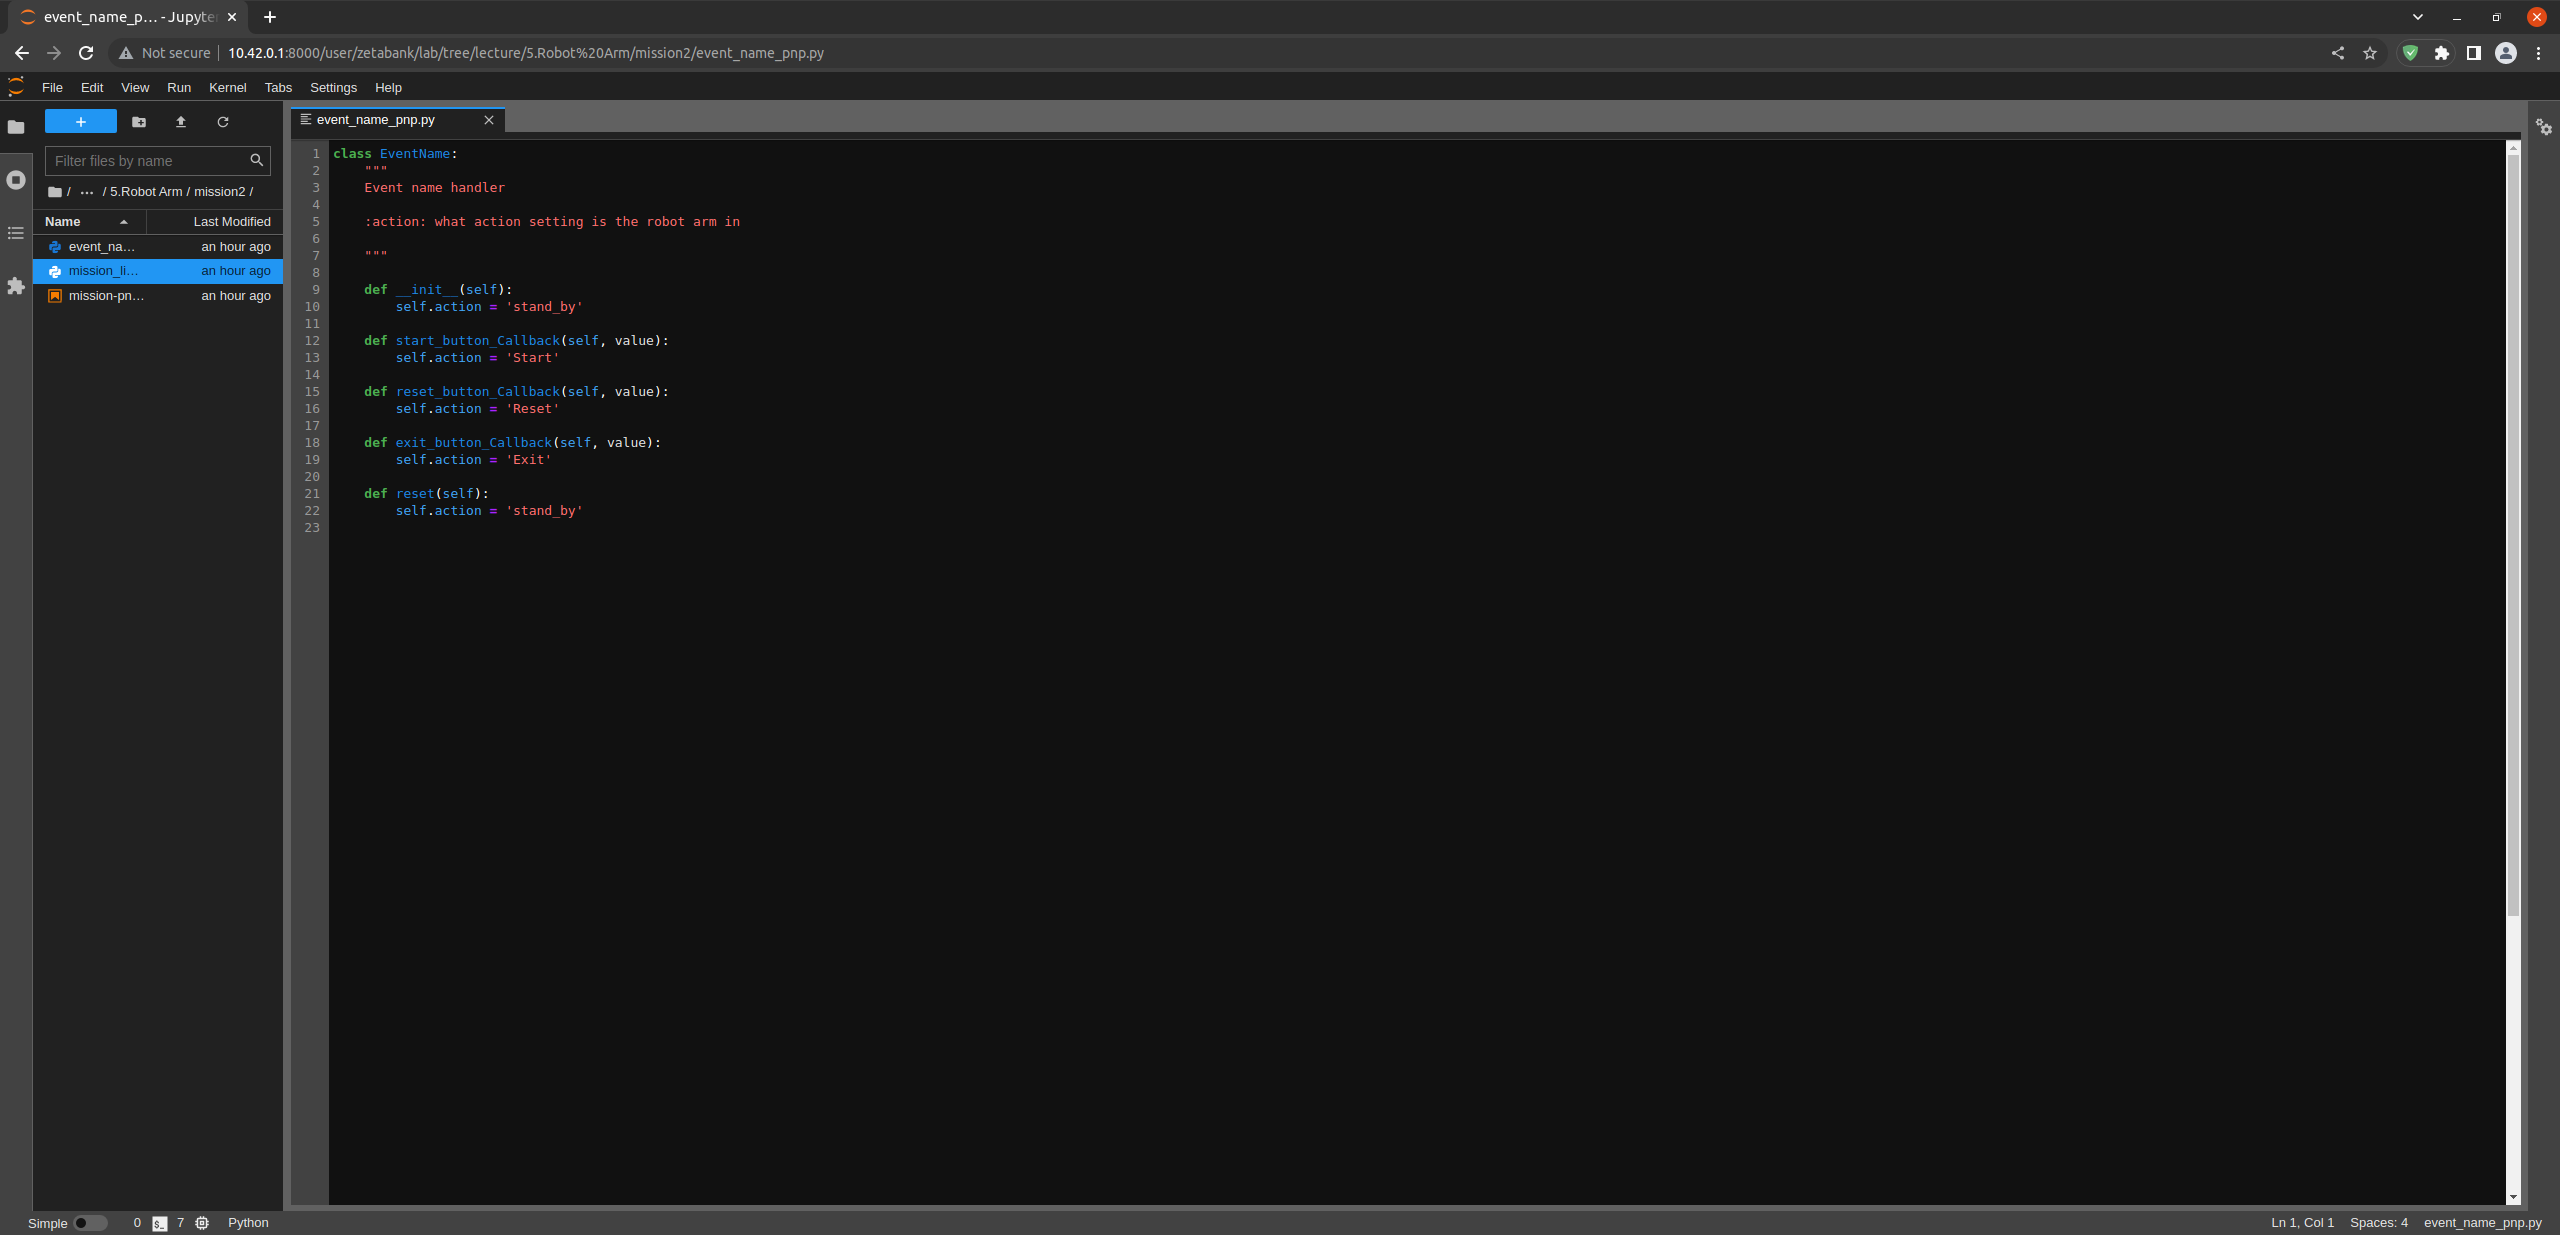
This python library is responsbile for creating an action instance and providing settler funtions.
class EventName:
    """
    Event name handler

    :action: what action setting is the robot arm in

    """

    def __init__(self):
        self.action = 'stand_by'

    def start_button_Callback(self, value):
        self.action = 'Start'

    def reset_button_Callback(self, value):
        self.action = 'Reset'

    def exit_button_Callback(self, value):
        self.action = 'Exit'

    def reset(self):
        self.action = 'stand_by'
Lets Start the Mission!!!
Open the mission folder and open the mission-pnp.ipynb file.
mission-pnp.ipynb
To control the robot arm from code, don’t forget to shut down the docker container. See here.
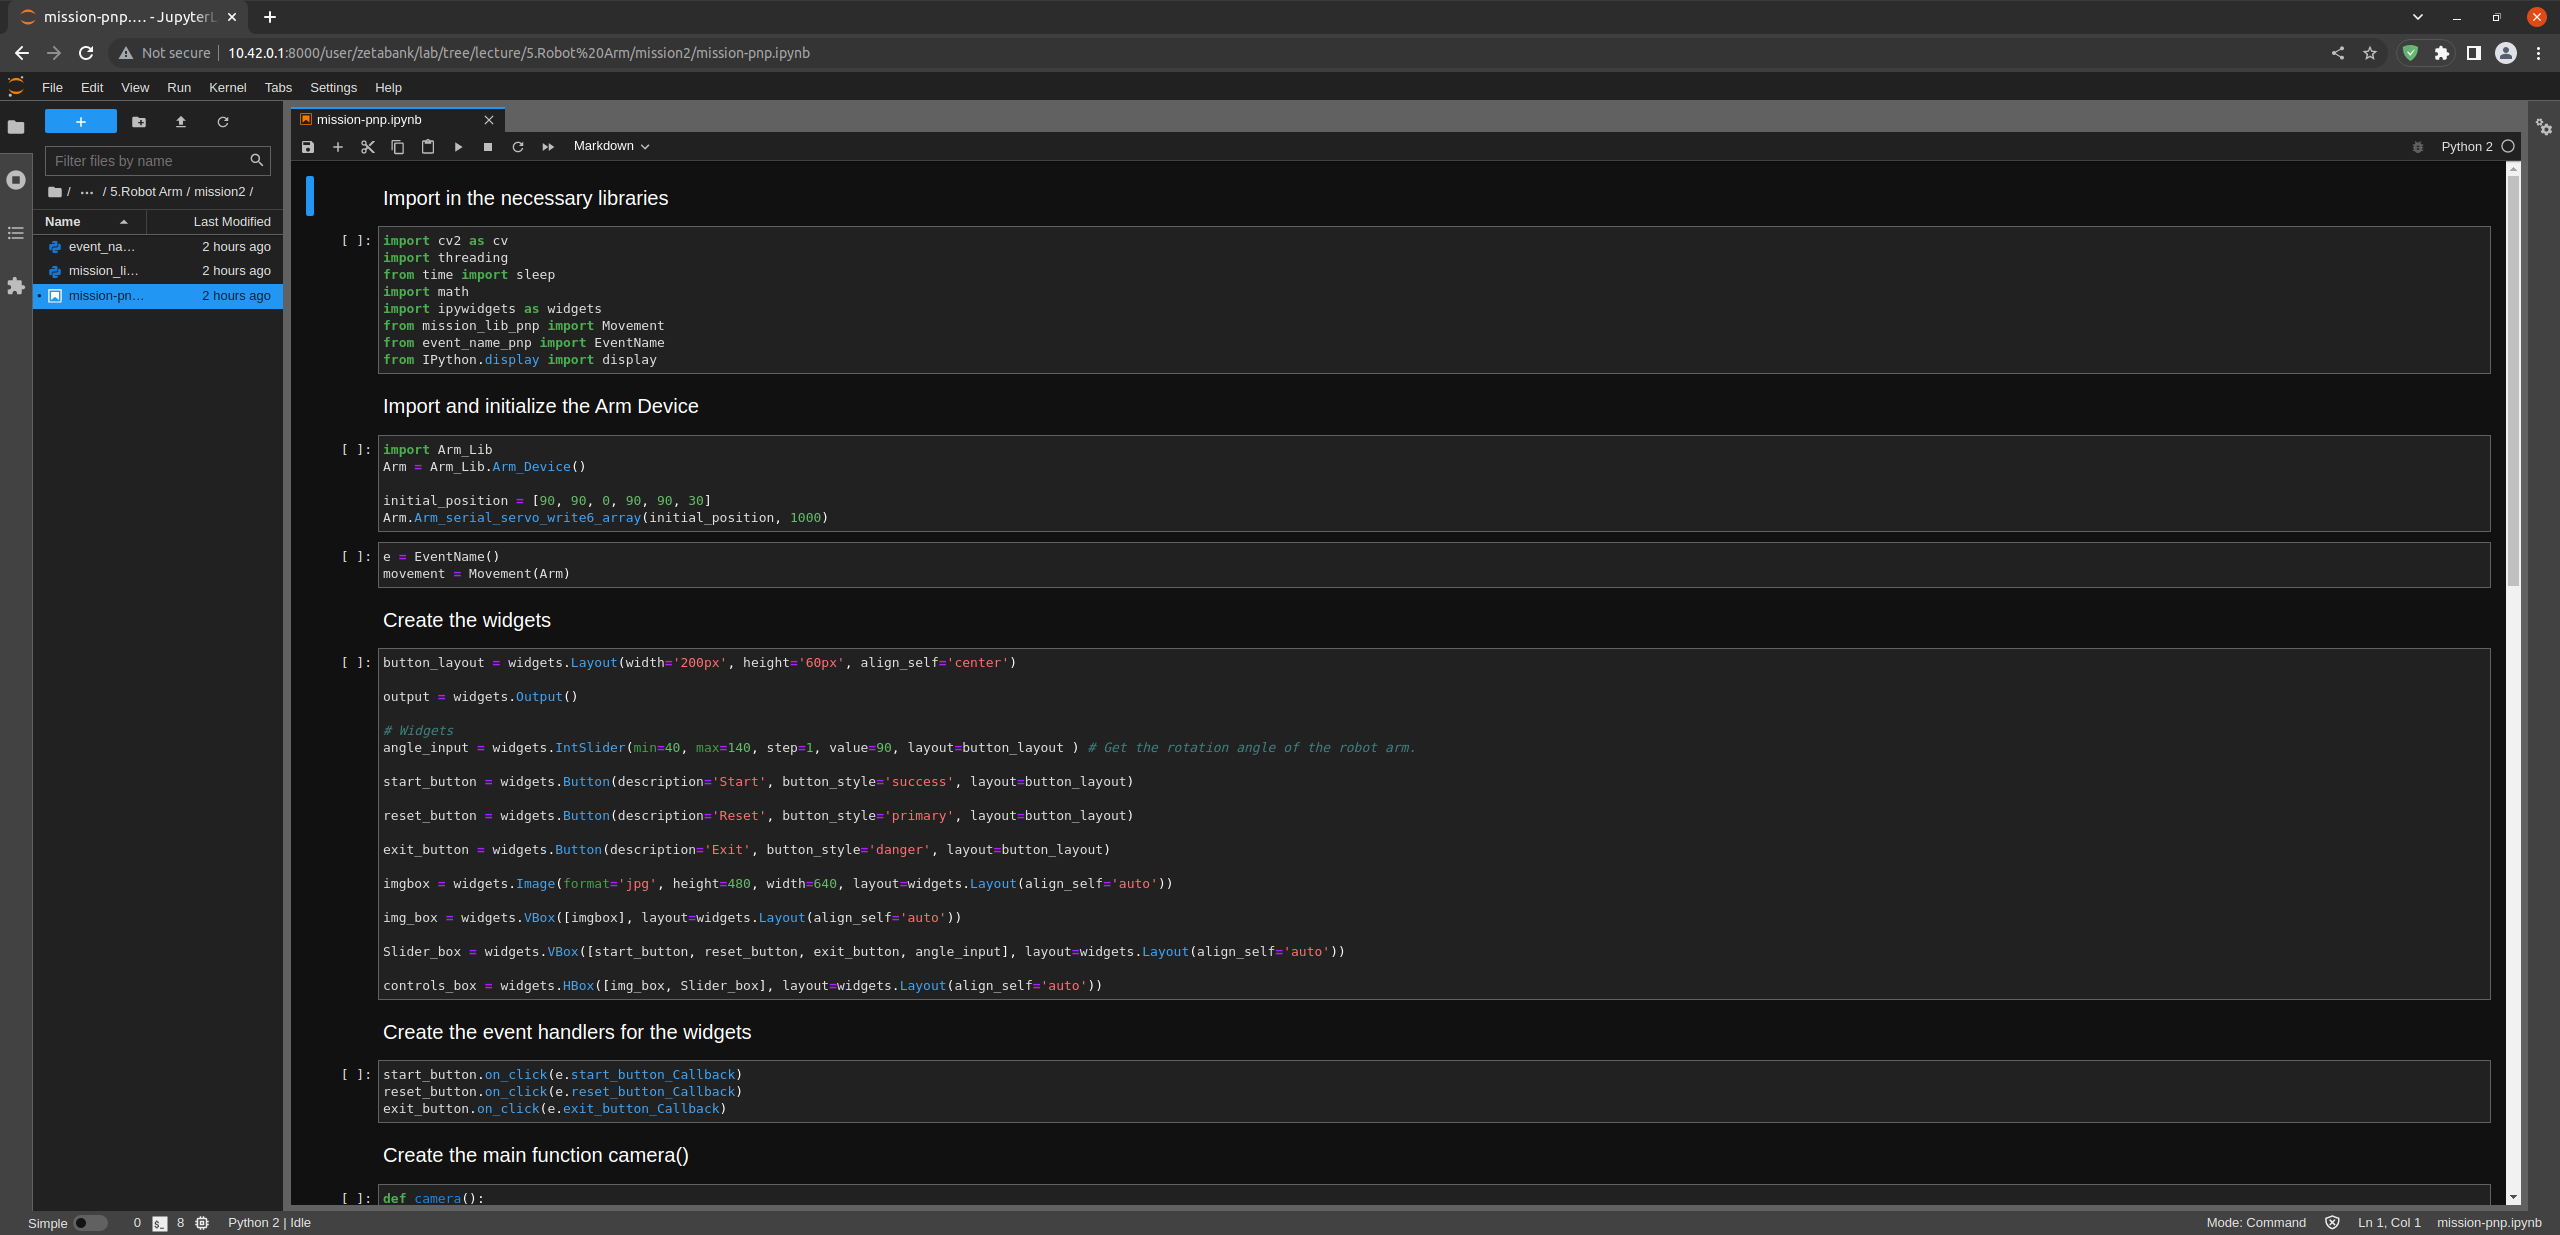
First, import in the necessary libraries.
import cv2 as cv
import threading
import os
from time import sleep
import ipywidgets as widgets
from mission_lib_pnp import Movement
from event_name_pnp import EventName
from IPython.display import display
Import and initialize the Arm Device.
import Arm_Lib
Arm = Arm_Lib.Arm_Device()

initial_position = [90, 90, 0, 90, 90, 30]
Arm.Arm_serial_servo_write6_array(initial_position, 1000)
Initialize the Movement and Event name objects. When initializing Movement object, provide the Arm object as the parameter.
Create the GUI widgets.
button_layout = widgets.Layout(width='200px', height='60px', align_self='center')

output = widgets.Output()

# Widgets
angle_input = widgets.IntSlider(min=40, max=140, step=1, value=90, layout=button_layout ) # Get the rotation angle of the robot arm.

start_button = widgets.Button(description='Start', button_style='success', layout=button_layout)

reset_button = widgets.Button(description='Reset', button_style='primary', layout=button_layout)

exit_button = widgets.Button(description='Exit', button_style='danger', layout=button_layout)

imgbox = widgets.Image(format='jpg', height=480, width=640, layout=widgets.Layout(align_self='auto'))

img_box = widgets.VBox([imgbox], layout=widgets.Layout(align_self='auto'))

Slider_box = widgets.VBox([start_button, reset_button, exit_button, angle_input], layout=widgets.Layout(align_self='auto'))

controls_box = widgets.HBox([img_box, Slider_box], layout=widgets.Layout(align_self='auto'))
Create the event handlers for the widgets. We connect these handlers with our event name, so that when the user presses the buttons, the names of the action changes.
start_button.on_click(e.start_button_Callback)
reset_button.on_click(e.reset_button_Callback)
exit_button.on_click(e.exit_button_Callback)
Create the camera function, and open the camera of our robot arm.
def camera():

    # Open camera
    capture = cv.VideoCapture(1)
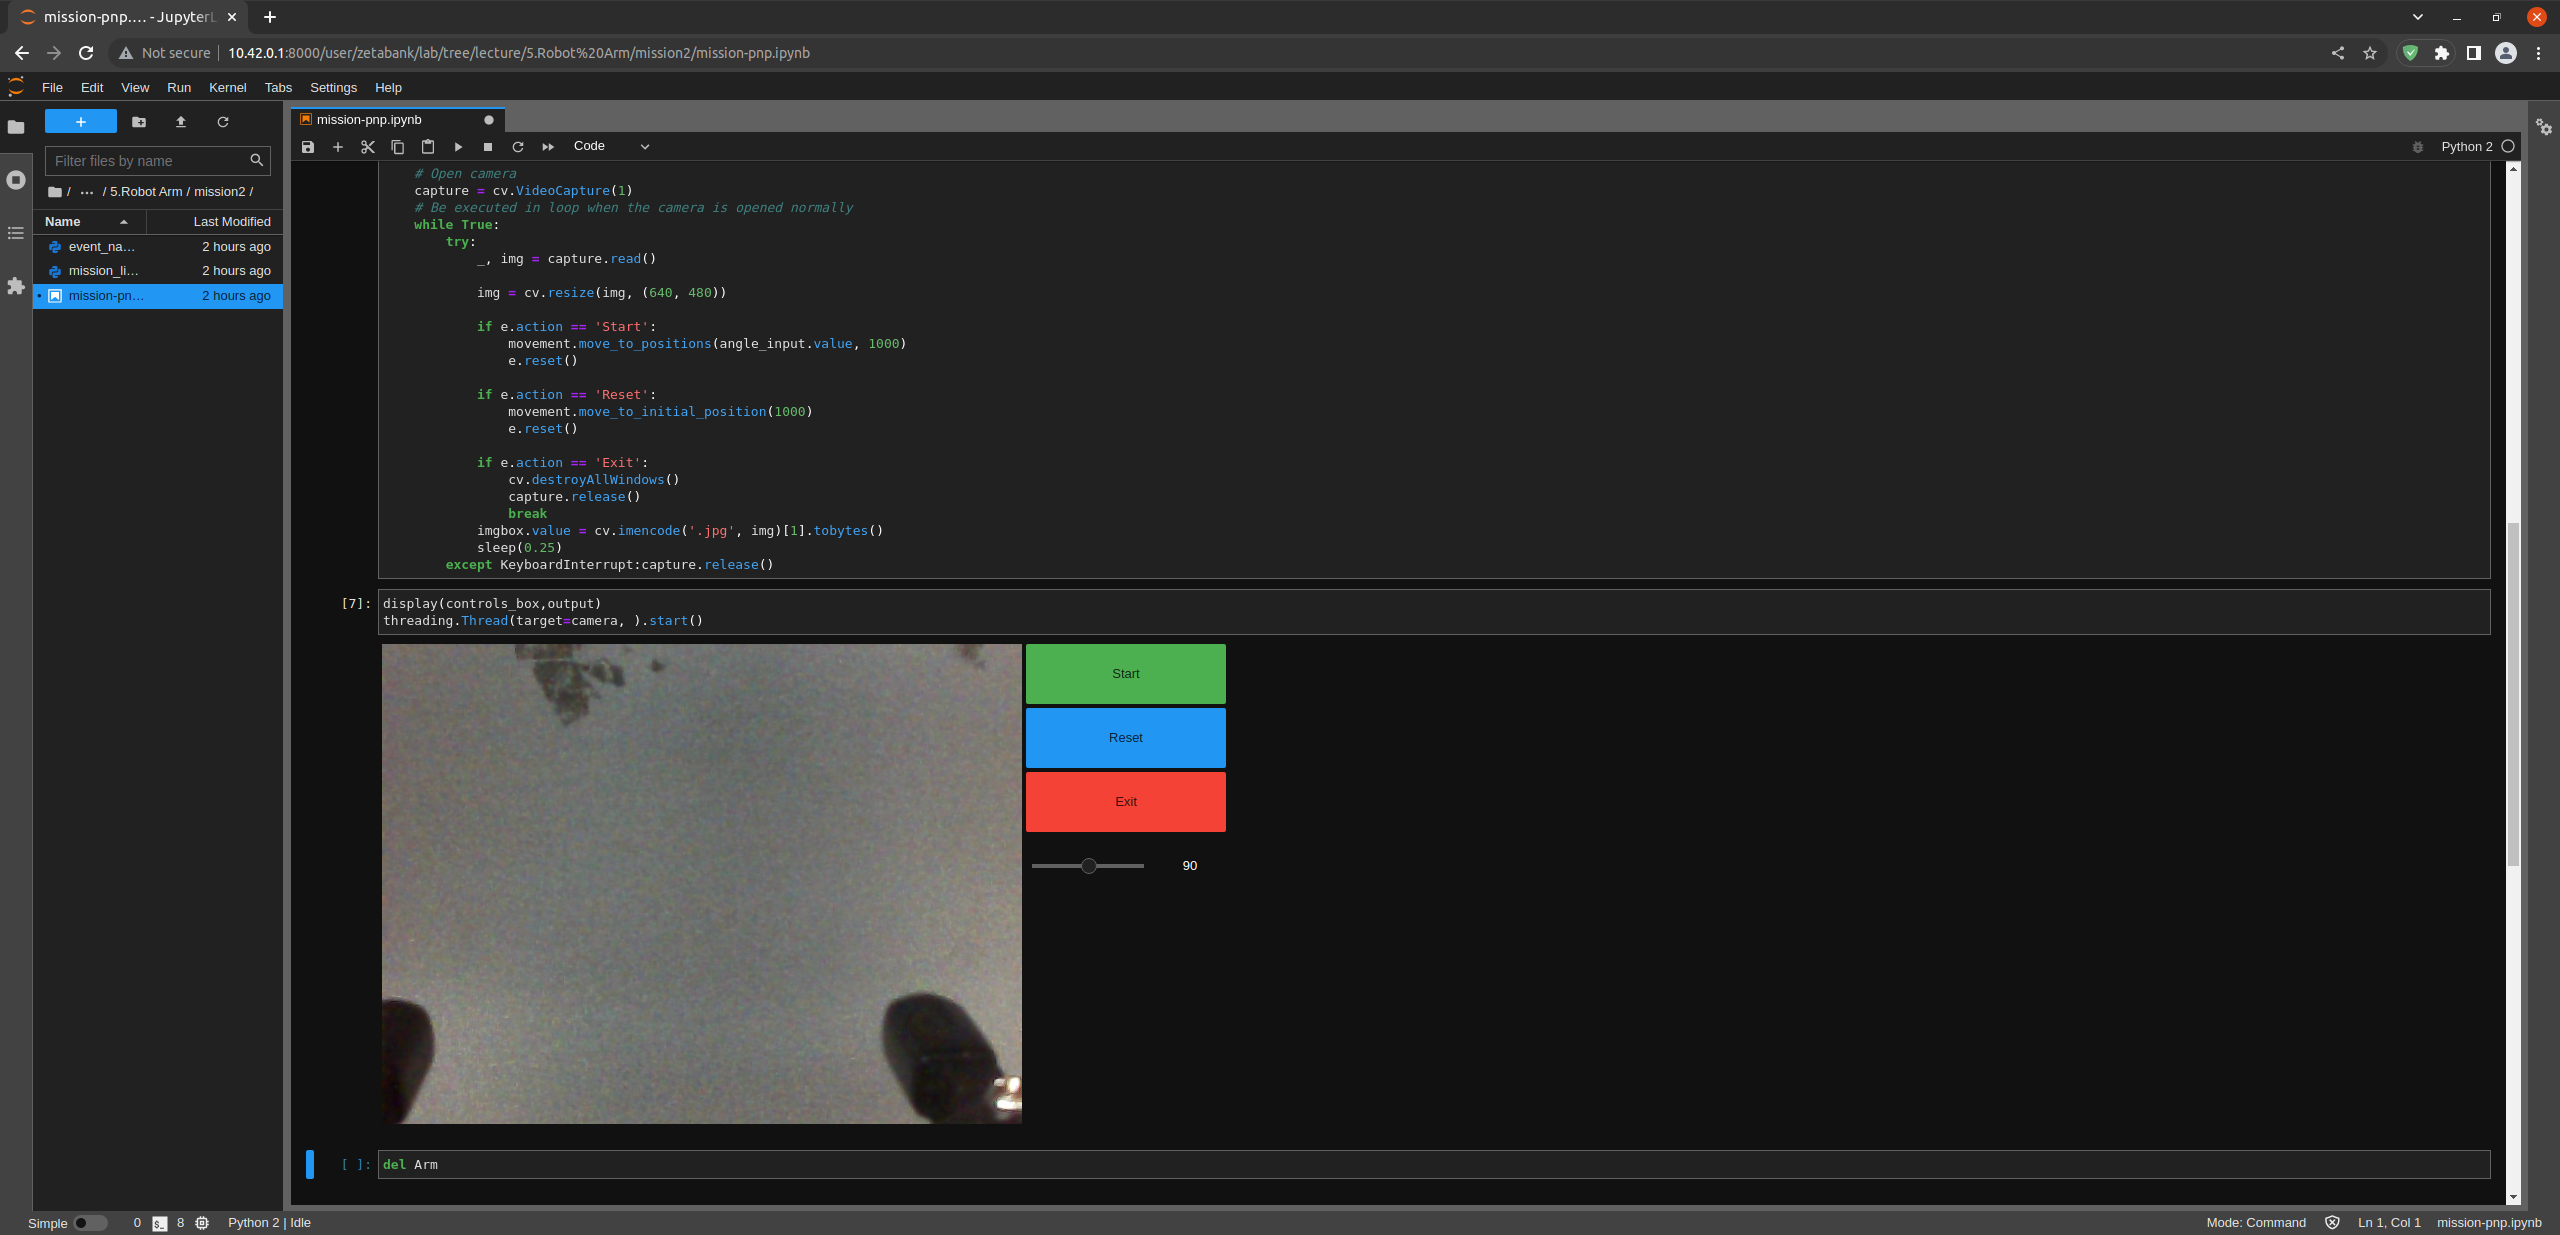
To process the incoming frames from the capture variable, create a loop.
# Be executed in loop when the camera is opened normally
while True:
Within the loop grab the camera frame and resize it to (640, 480) using the cv.resize function. With the help of if function, listen to the action variable, and assign an appropriate function when the action variable is changed.
_, img = capture.read()

img = cv.resize(img, (640, 480))

if e.action == 'Start':
    movement.move_to_positions(angle_input.value, 1000)
    e.reset()

if e.action == 'Reset':
    movement.move_to_initial_position(1000)
    e.reset()

if e.action == 'Exit':
    cv.destroyAllWindows()
    capture.release()
    break
imgbox.value = cv.imencode('.jpg', img)[1].tobytes()
sleep(0.25)
Execute the camera() function. Since we are working with multiple different variables and functions, wrap the process within a threat.
display(controls_box,output)
threading.Thread(target=camera, ).start()
Be sure to delete the robot after exiting the GUI.
del Arm
Pick up objects and place them automatically!
Now that we have built our program, using the GUI control and grab an object and place it somewhere else.

(IMPORTANT)
- The preset angles of the arm might not be fit for the environment you are in. Go to the mission_lib_pnp.py to change the angles or add more servo motor updates.
- It is highly recommended that you change and experiment around the mission_lib_pnp.py file and see how the movement of the arm is set up.